
 If you haven't discovered the fun with napkins, give this a try.
First decide what part of the napkin you will use. You may use all of it or little parts of it.
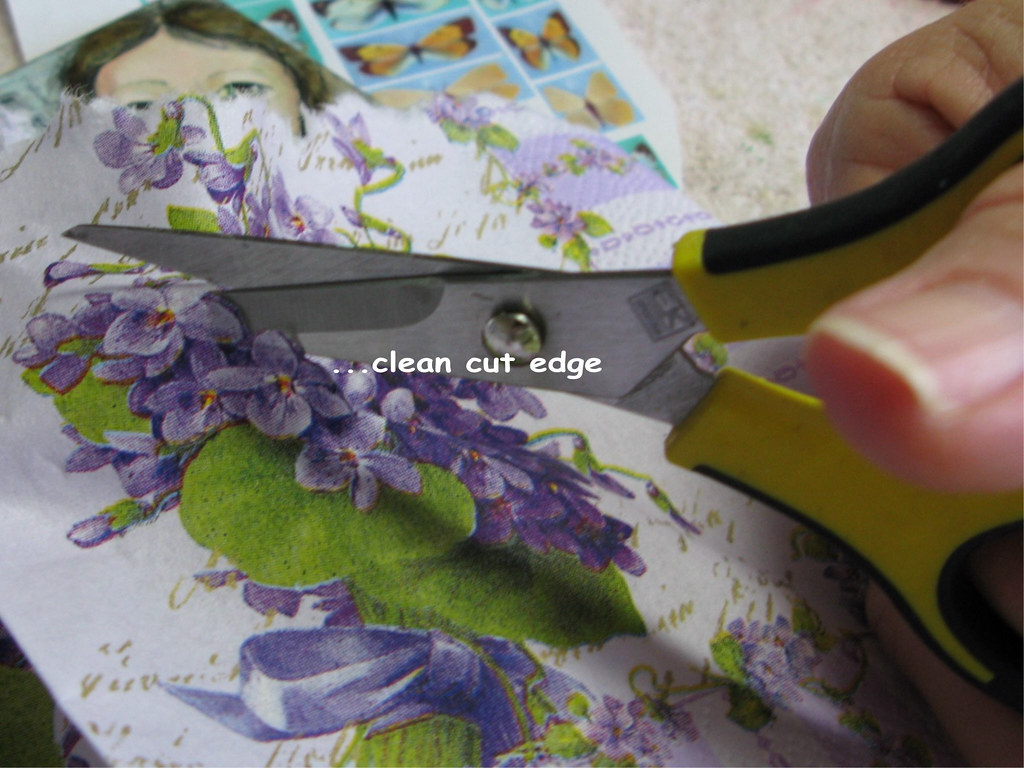
In this case I just need a few flowers. So, I used scissors to cut around them.
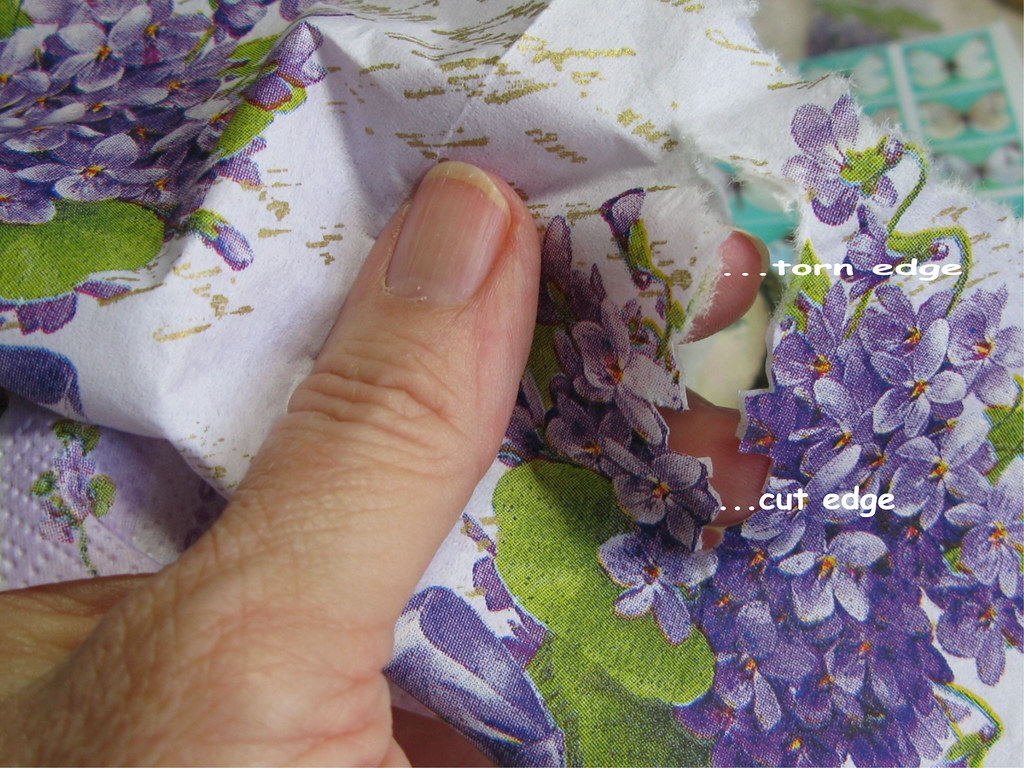 Then, notice that I tore part of the napkin. When the napkin is applied with Golden Matte Medium, the torn edge feathers out and disappears....almost.
Cutting or tearing just depends on what effect you want.
The cut edge was where I wanted more control.
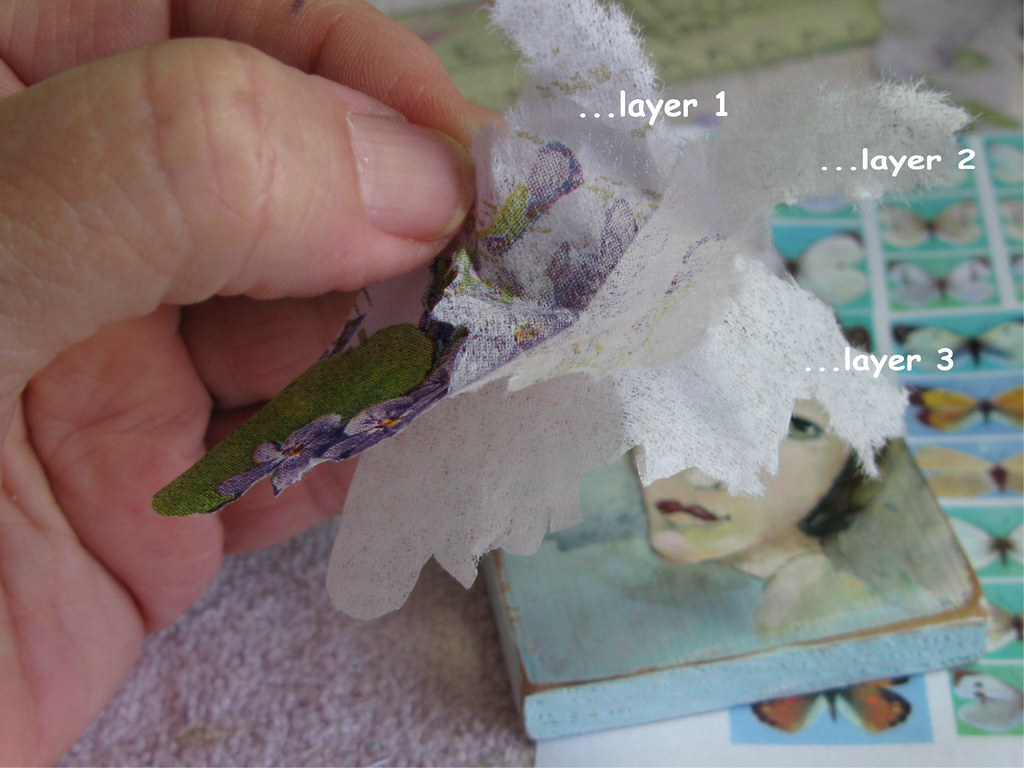 Mostly, napkins have three layers. Gently separate the layers because you only want to use the top layer.
Clue: the cut edge is sometime hard to separate. Hold the edge between your fingers close to your mouth and blow. It will separate enough so you can pull it apart.
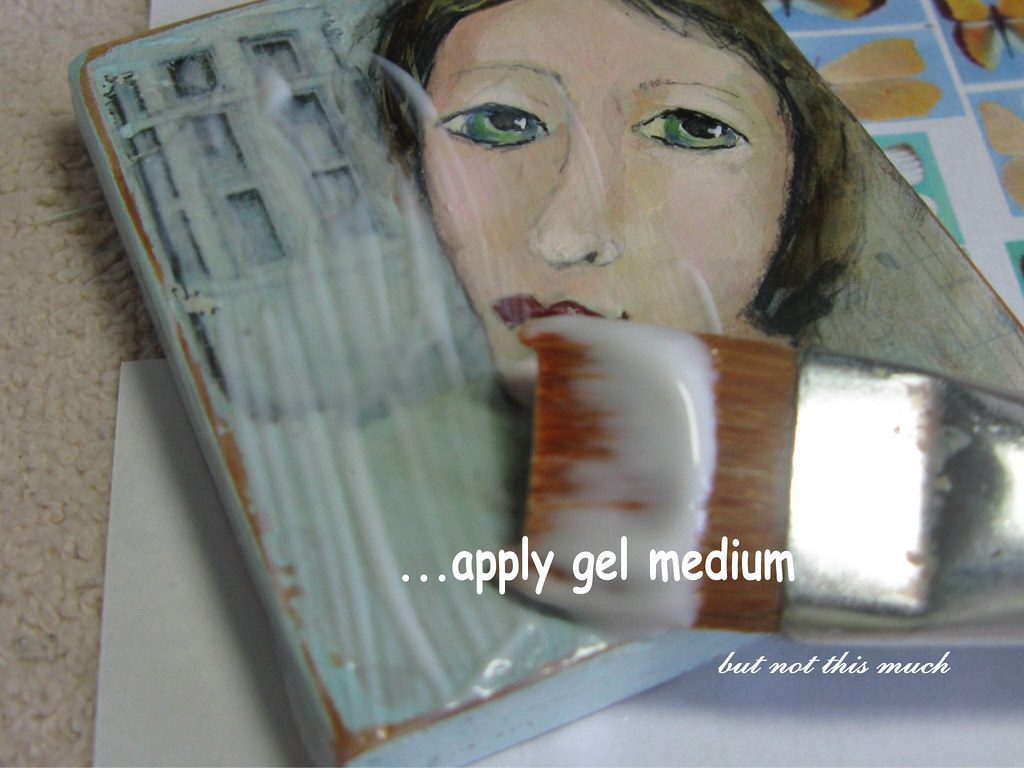 You cannot apply the medium to the napkin because it is too fragile.
Apply an even smooth amount of medium to your art.
This picture shows too much and was only for photographic purposes.
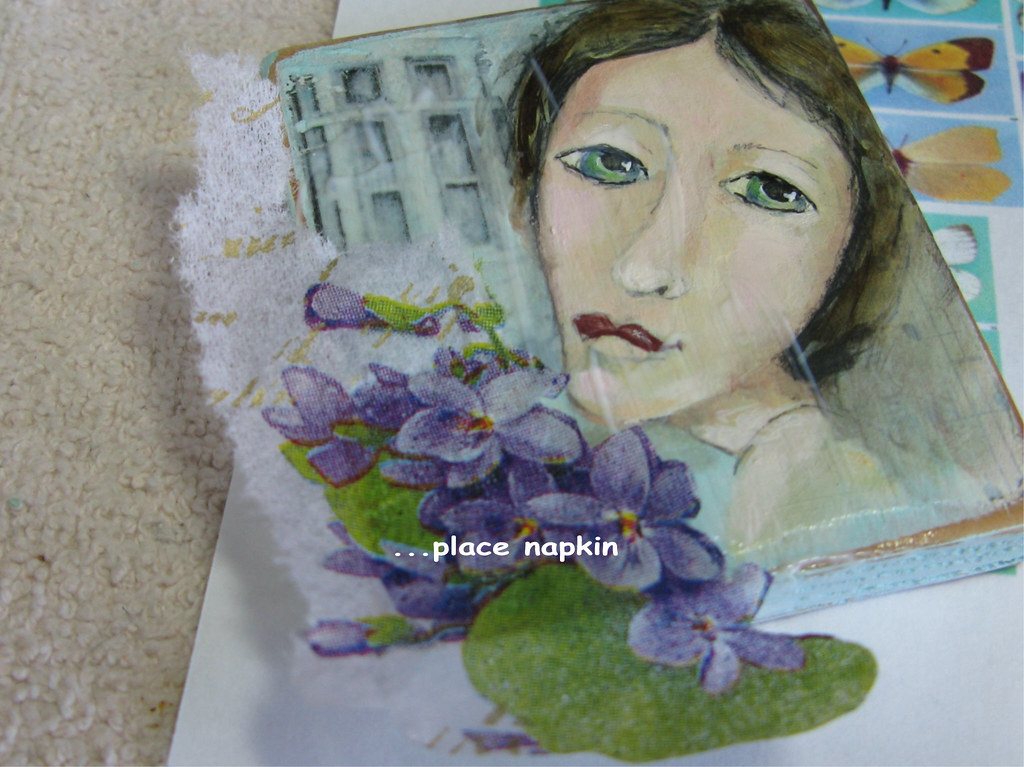 Gently lay the napkin in place. You will not be able to move it once it makes total contact. You can hold it up and gage where you want it.
When you are happy with the placement, use the brush that still has medium on it to gently smooth the napkin.
Be happy with a few wrinkles.
Then with your finger very very very very gently rub it a little more.
 You will discover after only a few moments, the napkin is biodegradable.
It just kinda wants to melt away. That is the good and the bad and sometimes the ugly.
I have to relearn this with each napkin that if play with.
Since placement is sometimes critical, just let the edge hang over. You can decide if you want to remove it or leave some.
 When there is an area like the little violet on her chin that you are not happy with, you can just rub it off.
This point is made because I sometime collage napkins into my altered books. The hang over part will tear right away along the paper edge and leave a beautiful edge.
Now let it dry. After it is dry, you can use other mediums over it. You can paint over it which I usually do. It want get wet and be fragile after it has dried.
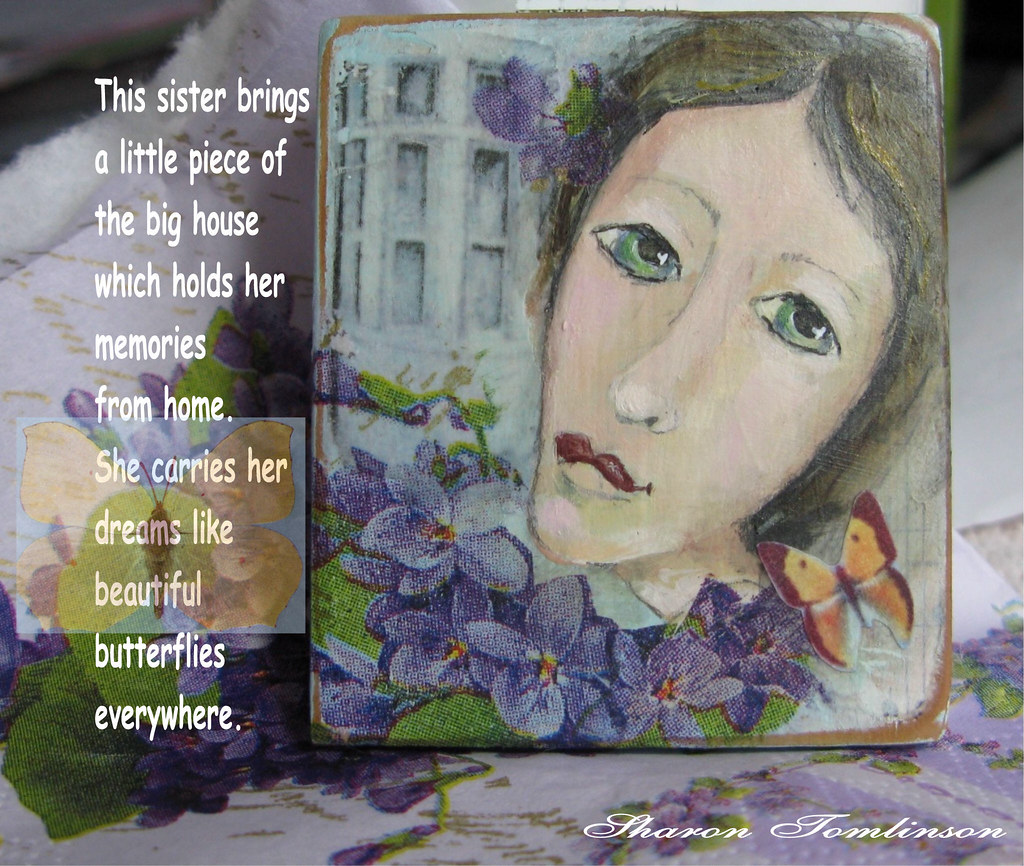
So here she is. Notice that I added more napkin at the bottom and in her hair. It is the transparent quality that is so appealing. Don't you think?
your blog is trouble, sharon!!! tooo many great ideas! gotta play with some napkins now! thanks for the super tutorial.
ReplyDeleteThe napkin tutorial was great. It turned out lovely. Your napkins were mailed yesterday so you should have them in a few days. i can't wait to see what you do with the white flowers.
ReplyDeleteKate
Sharon where usually do you buy napkins, I bought a lot in my trip to Brazil, collage there with napkins is hot and the craft stores has more than 1000 designs but here is not that easy , sometimes i see at Target.thats it
ReplyDeleteINDEED! An excellent tutorial for beautiful soft effects!
ReplyDeleteSharon, Your last two posts concerning the use of beautiful napkins in your art work were so very interesting that, even though I don't paint, I'm going to go look for some and try it.......you're just the BEST!!!!! Pat at birdnestontheground
ReplyDeleteHi Sharon:
ReplyDeleteShe is just SCRUMPTIOUS, SPLENDID, DELECTABLE !!!!! and the tutorial is wonderful - THANK YOU soooo much : ) Nappies in the mail !! I just have to try this now don't I, ha : )
Love & Blessings, Sandra in AZ : )
Sharon, you are always so generous with your ideas and techniques. It's absolutely fabulous.
ReplyDeleteI think I may have mentioned this before but Aleene actually makes a "napkin" glue. BUT it's for fabric! You can applique on fabric with paper napkins and it seals them enough to make them washable! I can see you using it on one of your fab bags!
(of course I have the glue but ask me if I've tried it yet....uh no - but I plan to at some point.
I actually have napkins to send you btw!
I haven't commented for a while but I am always reading and oohing and awing!
XO
Thank you so much for your tutorial. I am always tranformed by your art and indeed, I will try this. Also as I search for napkins, I will be thinking of you. I will send something wonderful if it is to be found.
ReplyDeleteI am ready!!!!!!!!
Hugs, Mary
Fantastic tutorial Sharon, thanks so much for sharing with us all... I am inspired as always after reading your blog.
ReplyDeleteShe really is a sweet sister this one.
p.s. are you going to let us in on the secret about Tuesday mornings?
Thanks for the tutorial. Your work is so lovely; it's nice to see how you create it. I am definitely sending you napkins.
ReplyDeleteLOVE THAT NAPKIN!!!! You really DO get the best napkins...but this one is over the top wonderful!! I always look for napkins when I am out and about. Or the little kleenex packs with delightful designs. My favorite over the years was a sunflower one that had the feeling of Italy. I think I have ONE left and I don't seem to want to use it.
ReplyDeleteSometimes I notice the gorgeous napkins in the store have annoying hole things at the most wonderful part of the design.....I would describe it as brail!!! and I don't get them because I think I will see that in the artwork. Do you know what I mean??
xo Rella
I loved the tutorial - especially the tip about blowing on the edge to help separate the layers..I always have trouble with that! I love, love, love that little painting - especially the way the napkins goes around the edge. Thanks for sharing your knowledge and experience so freely!
ReplyDeleteYour napkins are in the mail, but with all the flooding in Cedar Rapids, I doubt it will leave the post office for a few days.
Excellent tutorial! I've used napkins in collages for several years--I love that there's almost a translucent quality to the image yet there's also a textural feel to the page. I've found that a thin layer of glue first works best for me so I don't tear the design, then more later.
ReplyDeleteBeautiful work.
Me again--
ReplyDeletehere's an example with, if I remember correctly, 5 different napkin designs. I do love them.
You can bet I'll be participating in your swap!
P.S. Estate sales and Goodwills are good places to find napkins, too. I found vintage ones from Japan last summer.
Well! I am just stuck on stupid, because I had been trying to use all 3 layers... Thank you as always for the tutorial. There are those to the north east that are a tad bit isolated and don't get out much, LOL! gina
ReplyDeleteI JUST bought some napkins at our Country store here in town that I adore. Then I find your blog today...how serendipitous!
ReplyDeleteThanks so much for the tutorial!!! Your work is wonderful and I just love the faces. If only I could paint...not complaining, I have too much to do now. LOL Come visit me some time too! :)
I never! These are so cool!
ReplyDeleteLove the tutorial!
Sharing is a wonderful thing.
Susie Davis
Just love your tutorial, I saw it when it first came out and have never forgotten, I love using napkins in my work now. Posted a link to this page on the Milliande ning artist site as I'm hosting a napkin swap there, hope that's ok, I credited you etc. Just I'm new at commenting etc and want to do it right :)
ReplyDeleteI'm so happy you posted this! i'm inspired! Thanks!
ReplyDeleteFabulous tutorial! You are so generous with your knowledge. :)
ReplyDeleteWhat a great idea, Sharon. Thank you!! :))
ReplyDelete